
 Who is this for? Someone with...
In this Gig Tutorial we'll create a Banner Ad graphic design service
1. What's a Banner Ad? A web banner or banner ad is a form of advertising on the internet often appearing on the top, sides or bottom of web pages. They usually contain a link that directs the person who clicked on it back to the website of the product or service that the ad is promoting. Web banners, or banner ads, are often used on websites that focus on a particular topic that is similar or related to the product or service the banner ad is promoting. For example, placing a banner ad that promotes a particular type of dog collar on a pet store website makes sense because that pet store website will likely attract dog owners who might be looking for a new collar for their dog. Thus, dog owners who visit the pet store's website will be more likely to click on the ad for the dog collar than if that ad was placed on a department store's website. Below is a website with examples of web banners, or banner ads (each visual element with a red highlighted oval or box around it is a banner example): 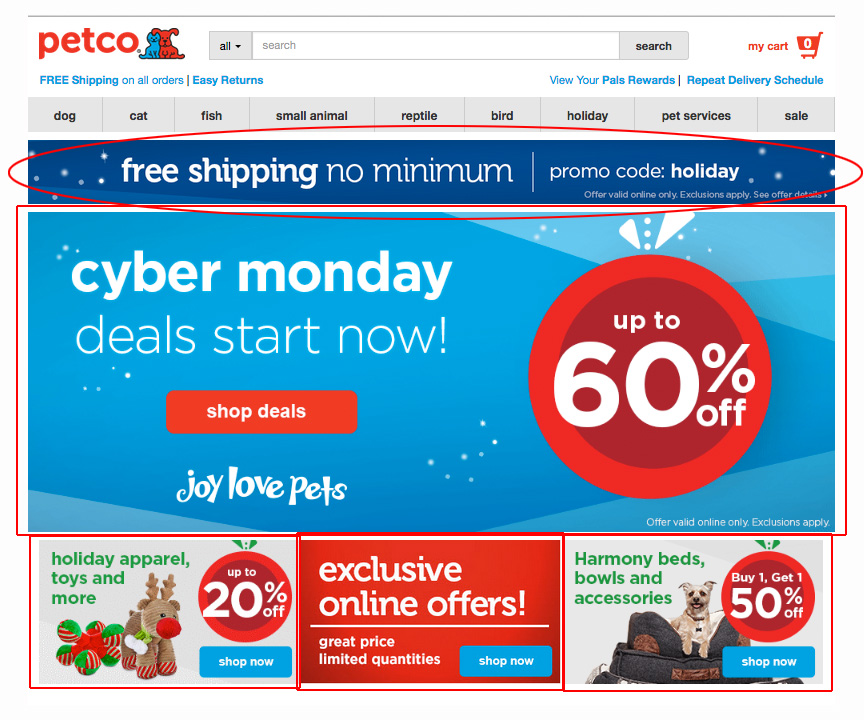 As you can see banner ads come in various sizes. They are often in a square or rectangle shape to easily fit within the layout of a web page. Below is an image that showcases the pixel dimensions of the most common web banner sizes: 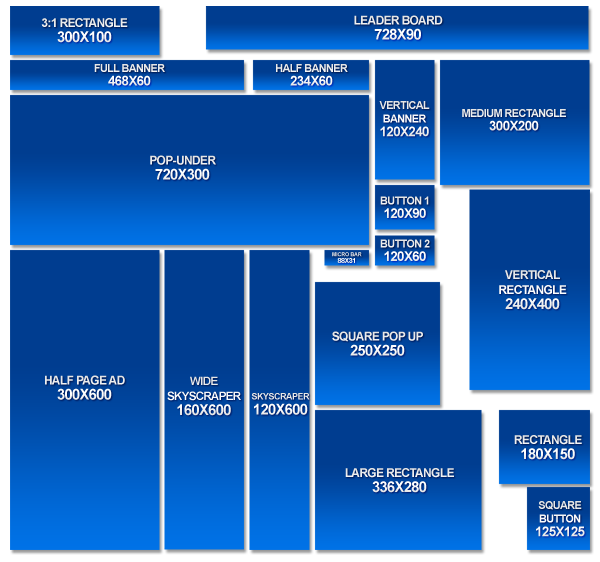 Below is an example of what one product or service's banner ad might look like in various sizes: 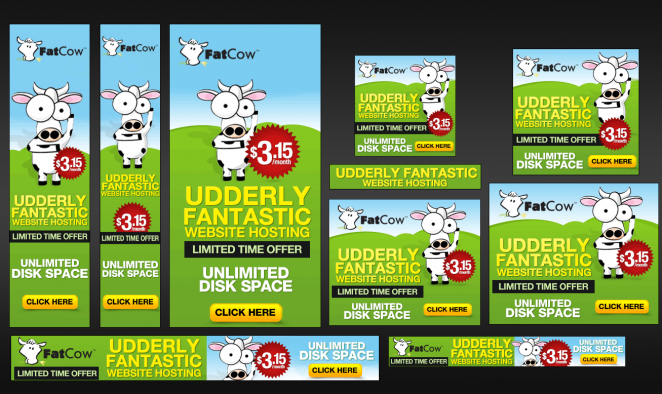 Here's another example of a banner ad on a blog site:  Banners can also be used in other places online, like on social media sites, to enhance the look and feel of an individual's or company's social sites. These kinds of images are sometimes called Social Media Profile Background Images. Each social network has their own pixel dimensions for these kinds of background profile banners. Here's a guide for those image sizes. These social media profile images simply help to make people's social media profiles (a web page) more visually interesting and graphically appealing to visitors of that profile. (See the following 3 screenshots from social media profiles. The banner examples are highlighted with red boxes):    When a website owner hires you to create a banner for his or her website, you, as the designer creating the banner, are not responsible for adding the final banner design to the website owner's site, unless you've agreed to do this for them at the beginning of your work engagement with that website owner. Typically, as the banner designer, you are simply delivering the final banner design in a JPEG or PNG file format to the website owner who hired you to create the banner. 2. Tools to create Banner Ads Adobe Photoshop Photoshop is the industry standard photo editing software. It's a great tool for creating web banners. However, not everyone can afford this software. There are other low, and no-cost alternatives to Photoshop. Canva Canva is another web-based graphics editing application. You can set up a free account, which allows you plenty of creative features. Canva has templates that allow you to easily create many common banner and graphic design image sizes with one click. You can also create your own custom sized images as well. Canva has a library of free icons and images you can use in your designs and it allows you to upload images on from your own computer to use in your designs. How will I know what text and images to put into the banner ad? That's a good question. Later (as you scroll down this post) we'll actually walk through setting up your banner ad service Gig on Fiverr.com - the Marketplace where you will make your banner ad service available to others across the internet. Essentually, you will have your clients share with you what text (or what we call in the design/marketing business, the copy) should be. Providing you the exact text that should appear in the client's ad is a piece of information that the client should share with you upon ordering your banner ad graphic design service. Delivering a Final File Format to Your Client When you finalize your banner ad design for a client you will want to save it as a .JPEG or .PNG image file. Because banner ads are for online purposes 72 dpi (dots per inch, which is the overall design resolution) should be fine to showcase good design clarity online. As a web banner designer, you don't have to worry about publishing the banners to your client's websites. You're just responsible for delivering (electronically) the final file formats of the designed banners (again, usually .JPEG or .PNG). Where to source images? As you build your banner ad graphic design service on Fiverr you will likely need images to help your web banners be visually appealing. Sourcing good quality images that represent the product, service or company brand of your client is a crucial part of designing banner ads. Luckily, there are several places online where you can find great quality images that you can use for free in your clients project. Pixabay offers over 800,000 copyright-free and royalty-free images you can use for your personal and commercial graphic design projects. Pexels is another online free-for-commercial-use stock image repository site. Scatter Jar is a free-for-commercial-use stock photo site specifically showcasing food-related images You can find several more such photo websites via a Google search for "Where to source free images for commercial use." 3. Setting up your Banner Ad service on FiverrIf you haven't already, create your Fiverr.com free account to begin selling your graphic design banner service. Below are the steps right from Fiverr's Support site. 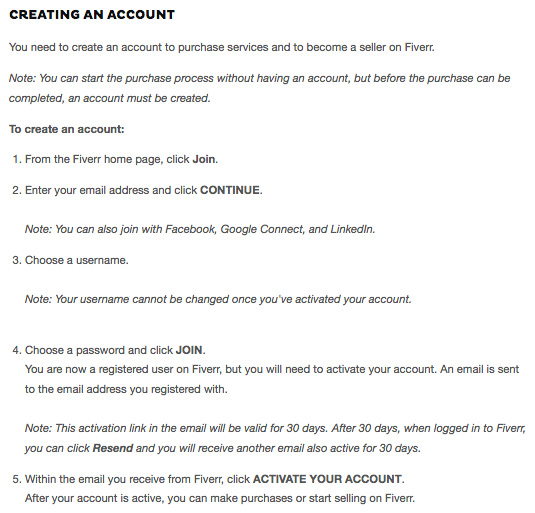 Now, we'll create your actual banner ad Fiverr Gig. Be sure to log into your Fiverr account. Once logged in, hover over the "Selling" navigational link at the top to show a drop-down menu of more options. Then click, "Gigs." (See the screenshot below) 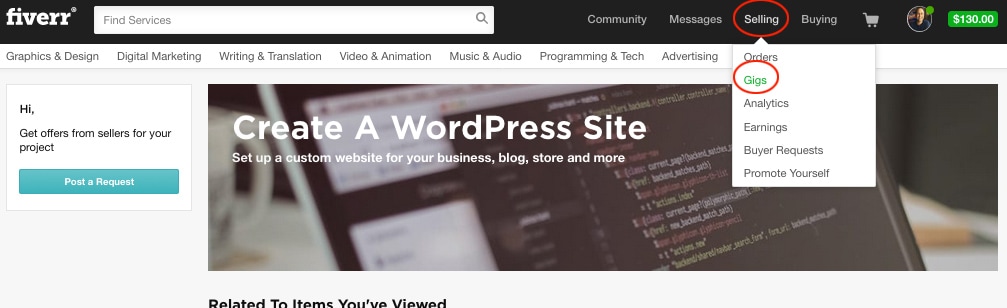 Now click the "Add a New Gig" button (see below screenshot) 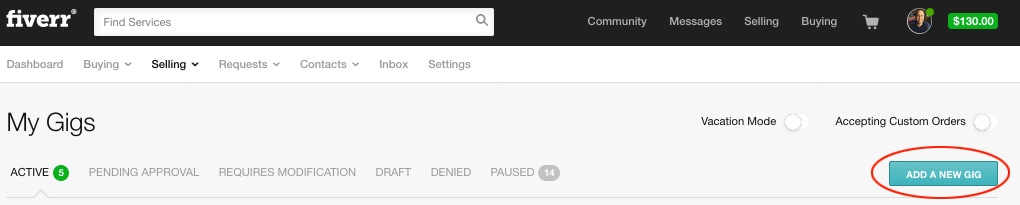 Next, you'll come to a screen that will ask you to title your Gig (the service you're creating). These Gig titles always start with "I will..." You don't have to actually write in, "I will...," it's provided for you. You'll just need to finish the statement. In this case, we're creating a banner ad gig, so we'll title appropriately. (see the screenshot below). 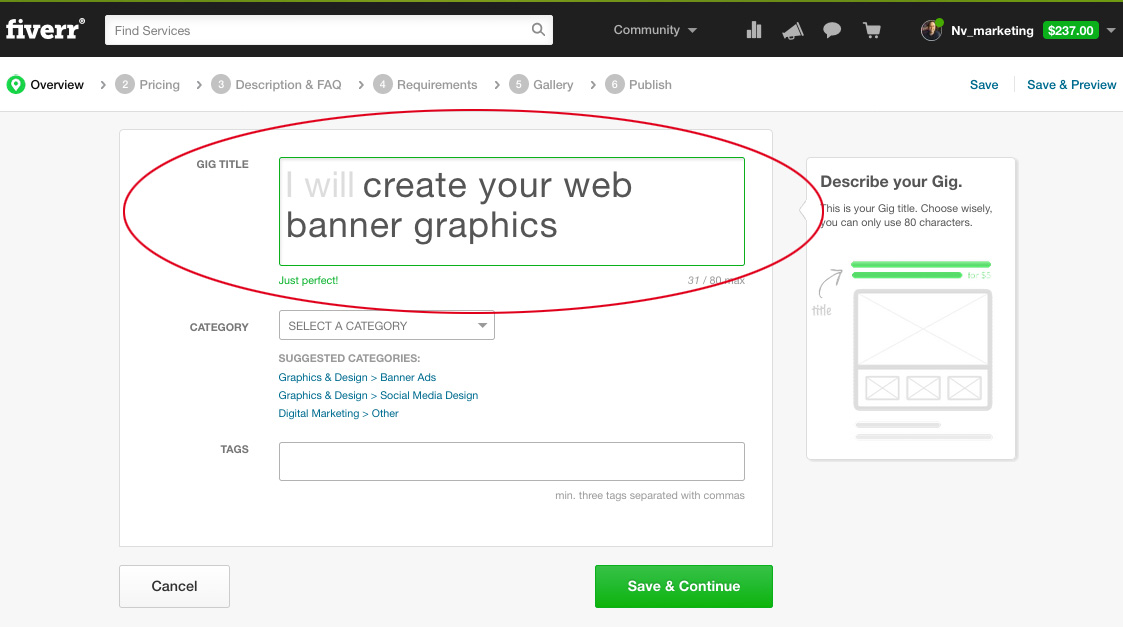 Under the "Category" section you'll choose from the drop down which broad category of service your Gig should be classified in. For our Banner Gig we'll select "Graphics & Design." Once your broad category is selected you'll have the opportunity to select a "Sub-Category." From this drop down list choose "Banner Ad," since that's the specific type of Gig we're creating. When you select "Banner Ad" as the "Sub-Category" more options will pop up underneath the category drop downs. For our purposes, you'll select the radio button labeled, "Static Banner." For now we'll only concentrate on create static image web banners instead of banners that move with animation. (see the screenshot below) 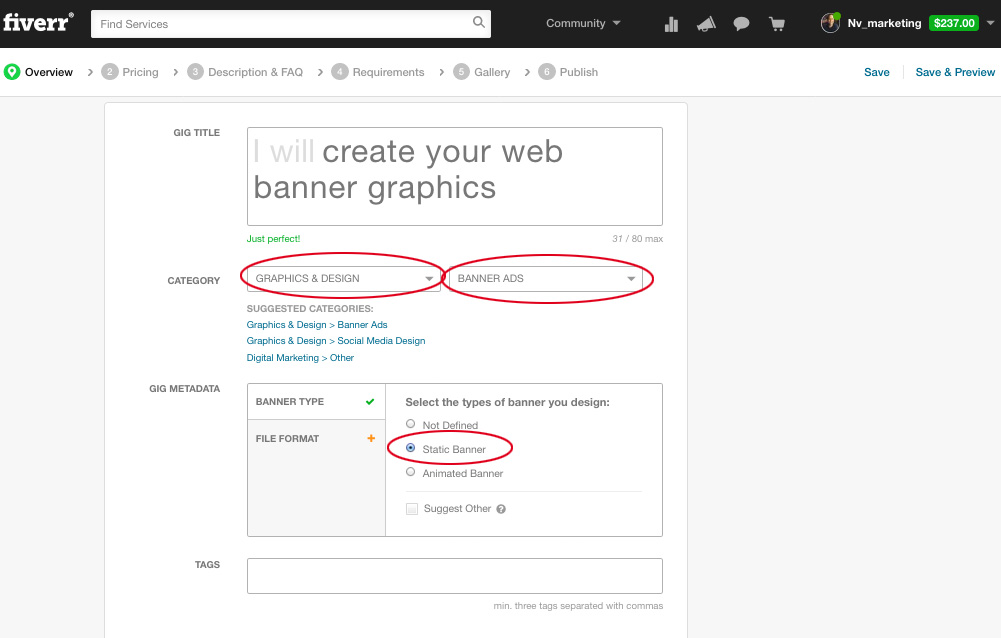 Now, click the orange "+" sign next to the words, "File Format." (See screenshot below) 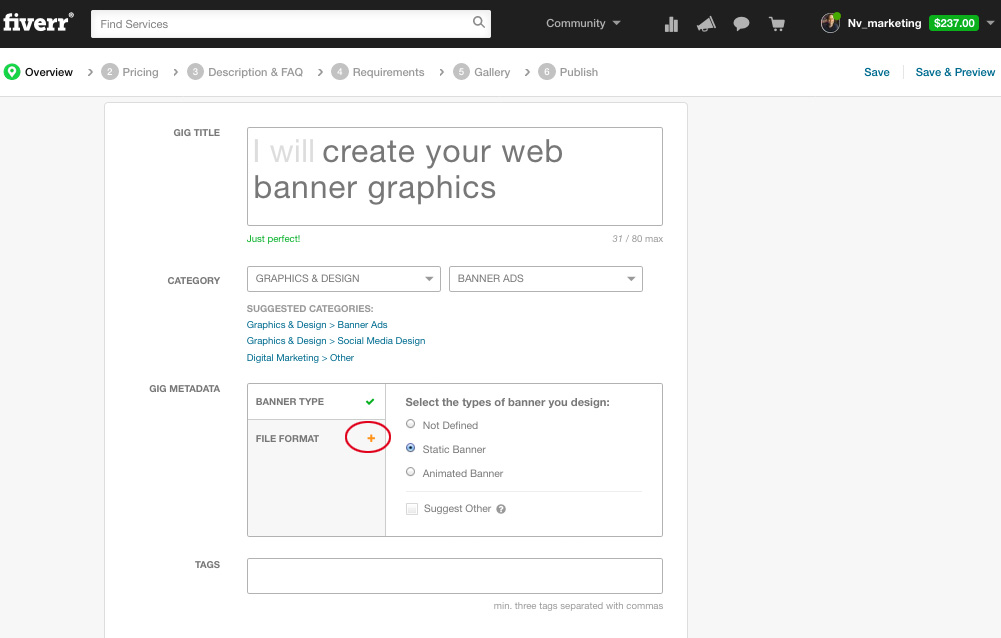 Once you've clicked on the orange "+" sign, different file format types in a check box pick list will appear. Choose the file format(s) you will deliver any final banner designs in to clients or buyers who order this Gig (service) from you. We'll select JPG and PNG. (See the screenshot below) 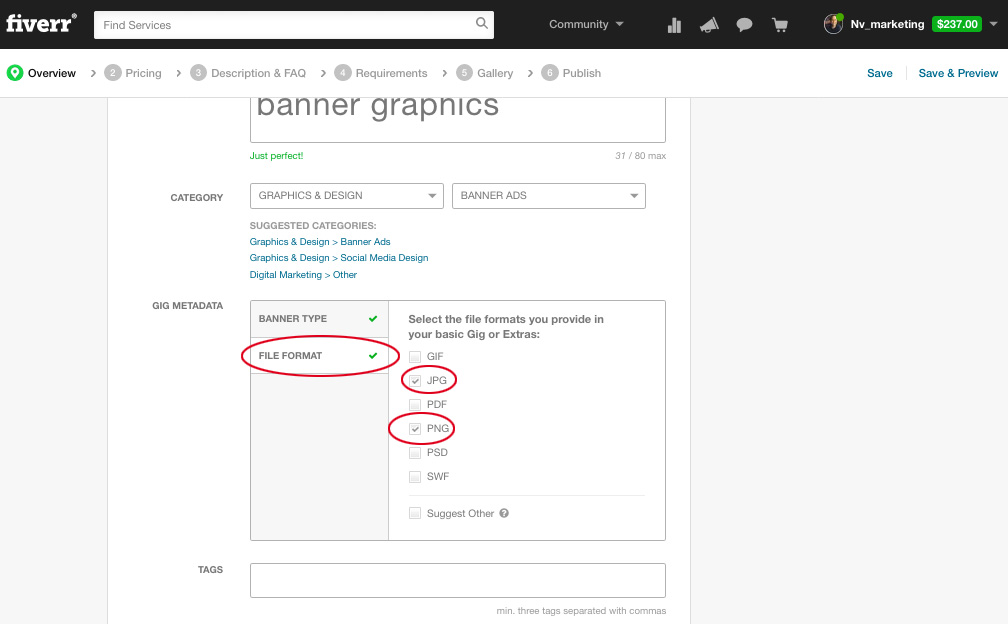 Finally, in this first section of setting up your Gig you'll want to "Tag" this Gig with specific keywords related to the Gig so Fiverr's Marketplace algorithm can find and promote your Gig. You must have a minimum of three tags. (See the screenshot below with tags lists) Once you're done with the "Tags" click, "Save & Continue." 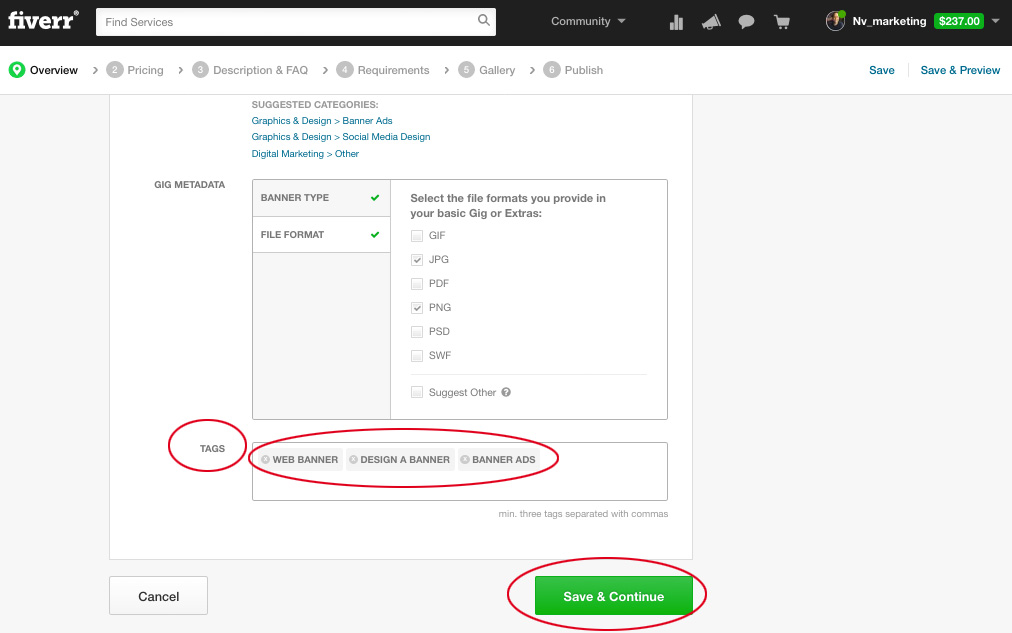 Next we move into the Pricing section of our Gig set up. When you first arrive on this screen (see screenshot below) you'll want to click on the "3 Packages" slider button in the upper right-hand portion of the screen. By clicking on this you will turn off the "Packages" pricing feature for this Gig. "Gig Packages" allow you to create different pricing tiers for your Gig with different price-points for each tier or "Package." "Packages" are a way to help increase your earnings as you deliever more value at the higher priced, more involved "Packages." For now we'll just set up a basic $5 Gig, but you can learn more about the 3 tiered "Packages" in the link to this video. 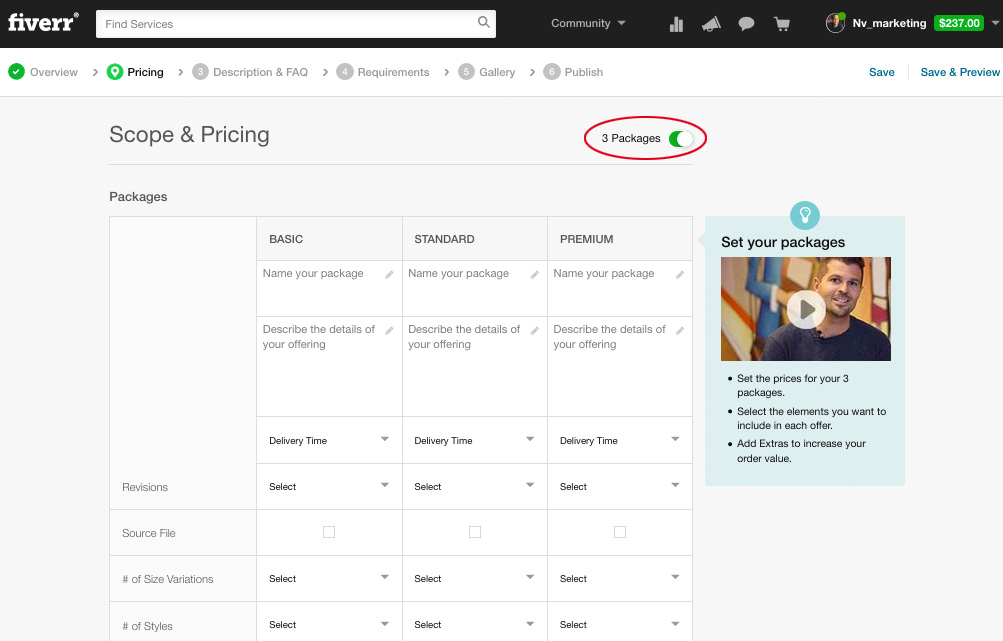 Now that the "3 Packages" slider button is in the off position, you'll see the "Basic," "Standard," and "Premium" pricing tiers reduced to just the "Basic" one, which indicates that you have only one price for your Gig. (See the screenshow below) 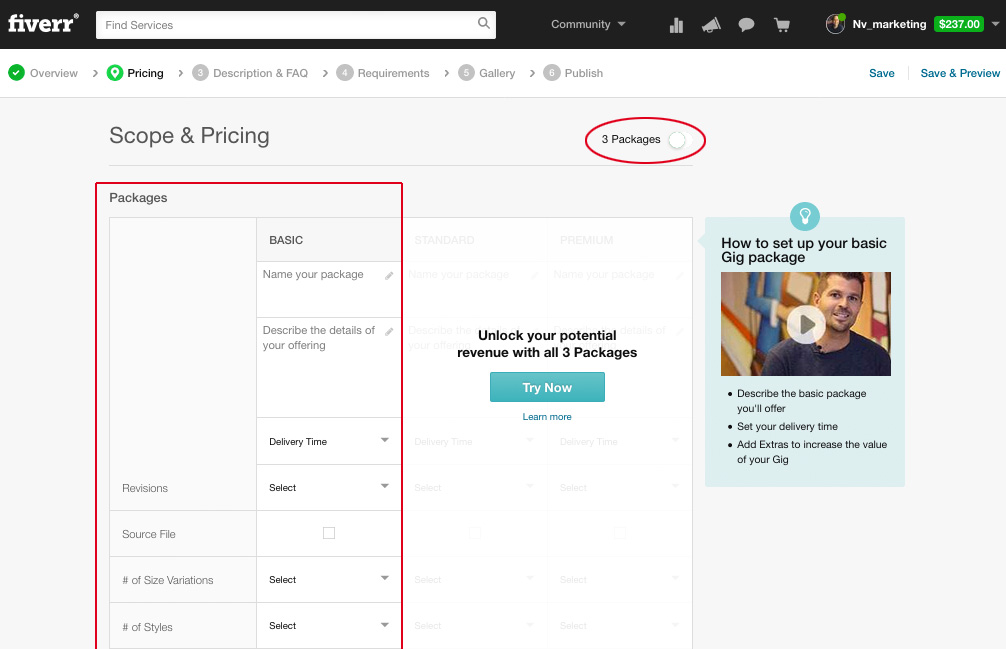 You'll want to name your "Basic Gig Package." In the screenshot below we've named ours, "Single Web Banner." Next, you'll provide some very concise details about the service you're offering. In the example below we've identified that we're offering a, "Static Banner delivered in JPG and PNG formats." (In the screenshot below "...PNG formats," was cut off, but it's actually there and will be once we Publish the Gig.) You then will need to provide a "Delivery Time." This is how many days it will take you to complete the order and deliver it (electronically) to the person who ordered your Gig. I would suggest between 2 and 3 days for this particular type of Gig, however, you can decide for yourself how much time you'll need. Finally, in the screenshot below you'll see that in our example we're not offering any "Revisions." "Revisions," are when you provide the buyer of your service with their web banner and the buyer would like to make a change to the design before accepting it as final and a completion of the order. For the total Gig price of $5 you may decide not to offer any revisions, as shown in the example. However, you can decide to provide a revision or a few (I would suggest raising the basic Gig price to at least $10 if you offer revisions). 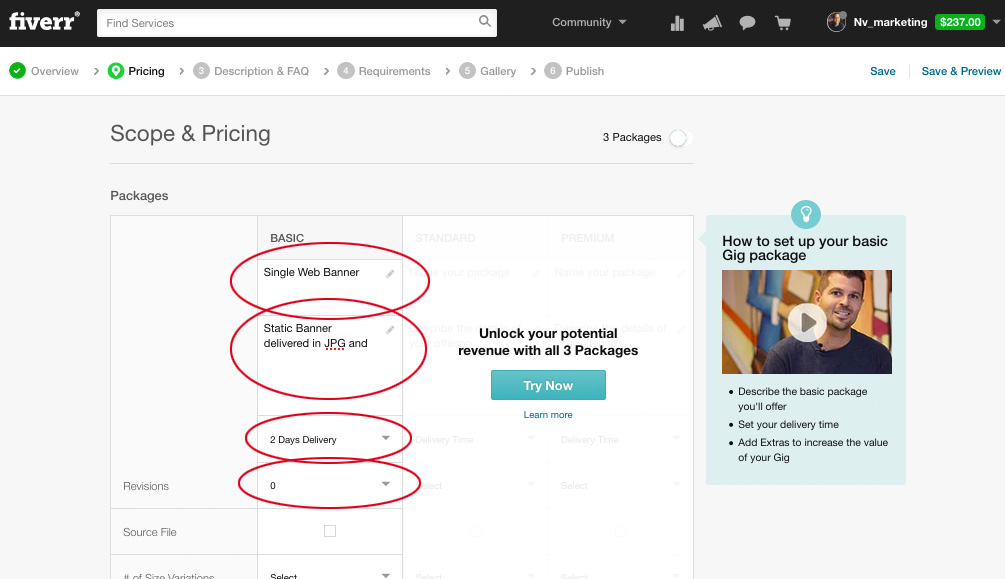 For the Gig we're setting up, we'll select the checkbox that indicates that our Banner service includes the creation of web banners for social media sites, if desired by the buyer. (See screenshot below) Also, you'll want to select your price for your Gig in this section of the Gig set up. For now, we'll make this a $5 Gig. 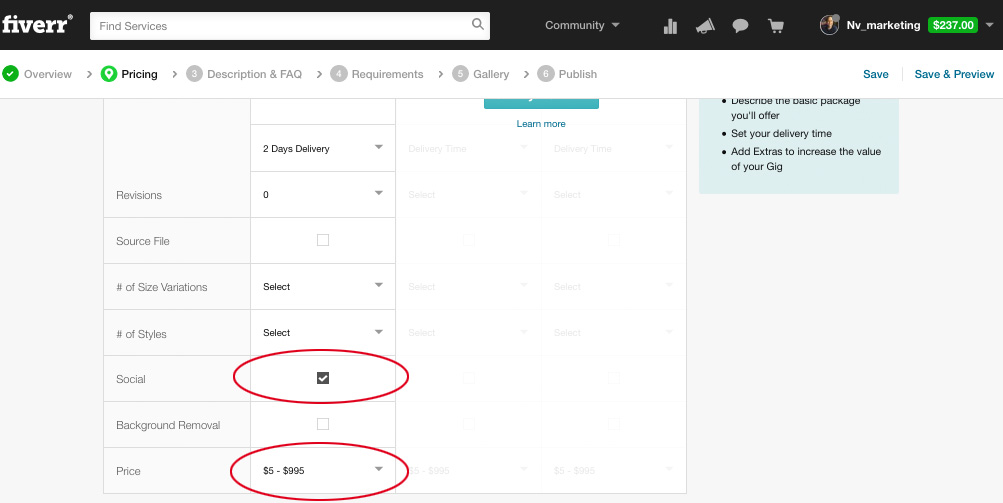 As you scroll down the Pricing section of the Gig set up you'll see something called "Gig Extras." "Gig Extras" are an opportunity for you to allow a buyer to purchase additional services within their purchase of your Web Banner Gig. For this Gig (see screenshot below) we'll add one "Gig Extra," in this case, we'll add, "Extra Fast Delivery," which means if a buyer chooses to purchase this particular add-on service, for $5 extra, I will deliver the final service to the buyer in just 1 day vs. the standard 2 day delivery turnaround time of the Basic $5 Gig. 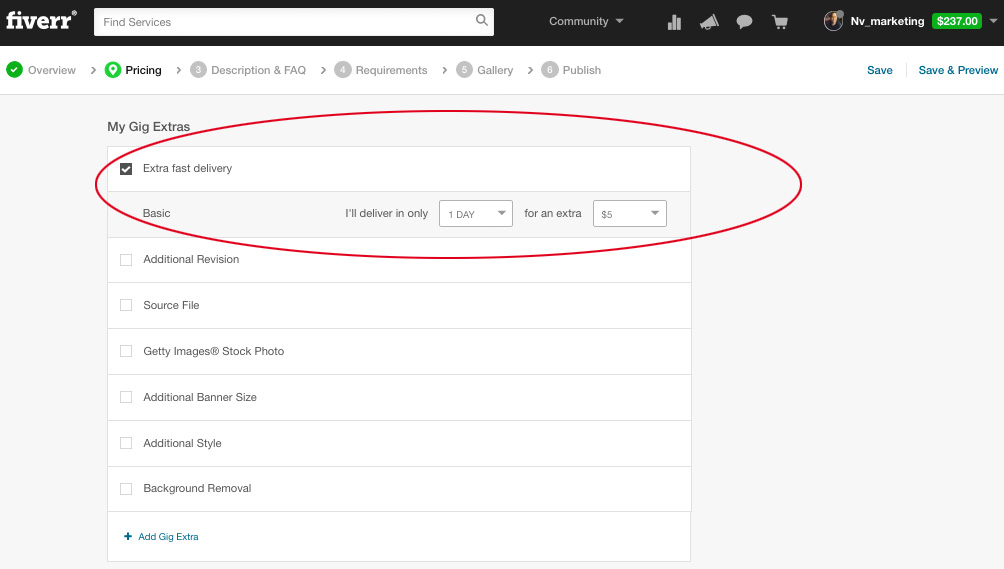 (See the screenshot below) For this Gig we won't bother with charging for shipping, as we are not providing any physical goods. So just click "Save" to complete this section of the Gig set up. 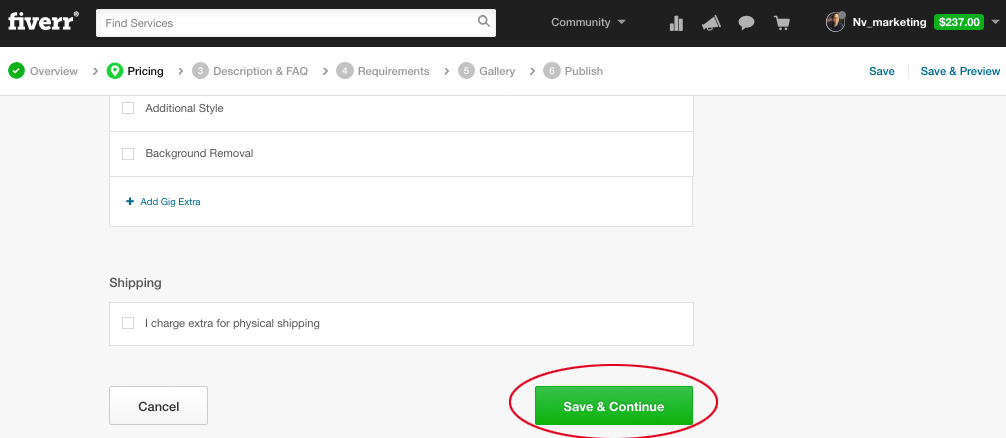 Next, you'll come to the Gig Description section. This is where you will describe your Web Banner service offering to the Fiverr Marketplace. In the screenshot, you'll see there is a text box where you can describe the service you're offering to give potential buyers a clear understanding of what your service is and provides should they decide to order your Gig. You have 1200 characters to use to provide your Gig description. There are some basic text formating tools within the Gig Description section so you can highlight text in yellow or make text bold to emphasize it. You can also use numbered lists and bullet points. All can be useful to create a clear and concise Gig Description. For this Gig in particular, here's the Gig Description we used (feel free to use it on your own Web Banner Gig if you'd like): I can help you with the following types of banners:
Please read the following carefully before you order! If you need a service that is not listed above, please contact me first, Please do not order! I will deliver final designs in JPG or PNG file formats. For each order I will deliver one (1) Banner/Header design size. Here is what we need to get started:
Message me first with any questions. I look forward to working with you! Thank you! 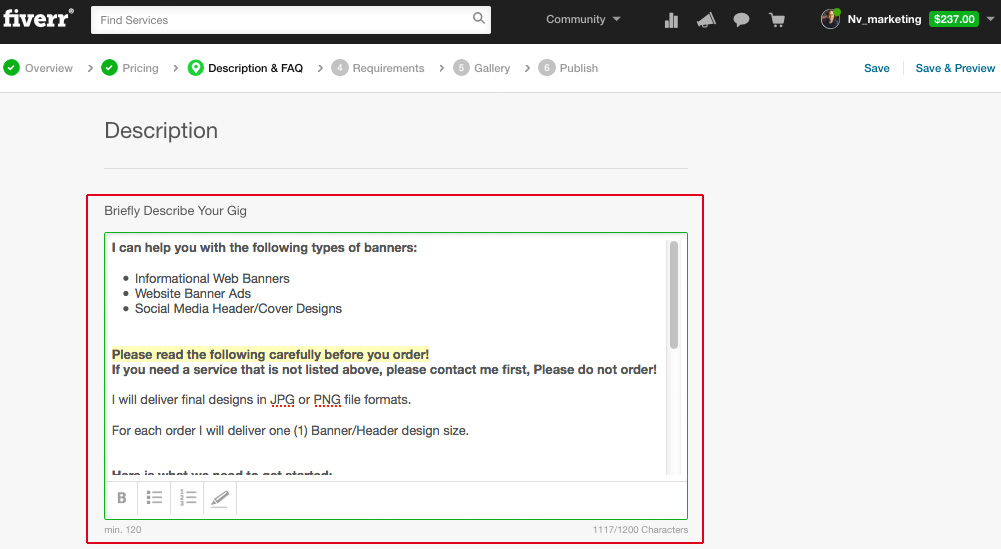 Just below the Gig Description is a section where you can add Frequently Asked Questions about your Gig that can help a potential buyer answer common questions they may have about your service. For our purposes, we'll skip this for now. We like to have buyers message us directly through Fiverr when they have specific questions so we can address them individually and provide a very personable customer service experience. So, once your Gig Description is written, scroll to the bottom of that page and click Save & Continue. 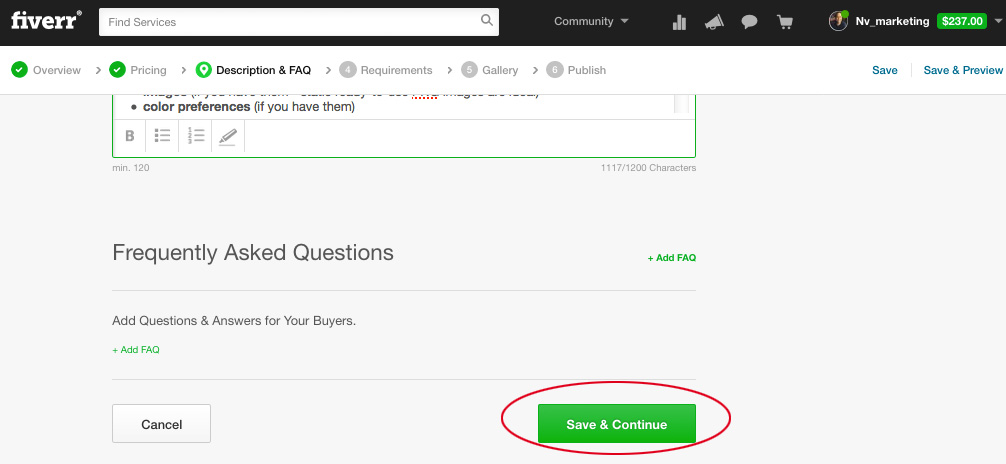 Now, we're at the Requirements section. This is where you ask the buyer of your Gig for crucial information you'll need to complete their order. Draft Requirement #1 (in our case that's all we'll need). On this screen Fiverr defaults to the "Free Text," option for including your Gig Requirements. You can keep it this way. "Free Text" just means we'll type in our own Requirements for the buyer. Next to the Answer Type you'll see a checkbox that indicates that the buyer is required to provide this information to complete their order. Keep the checkbox, checked. We want the buyer to provide this information. Now, go ahead and write in your Gig Requirements. Here's an example of what you might put into your Gig Requirements. (Feel free to use this in your own Gig. You only have 450 characters to for this; the following is 432 characters long.): Provide the following to ensure I provide you a quality web banner: --identify who your web banner's target audience will be --URL of your site if any --logo (if applicable - PNG file format is ideal) --Size width-height (the dimensions of your desired ad) --Specific text (important because I will copy and paste!) --images (if you have them - static ready-to-use PNG images are ideal) --color preferences (if you have them) When you're satisfied with the way your Requirement #1 is written, click "Add" to attach that requirement to your Gig. Then click "Save & Continue." 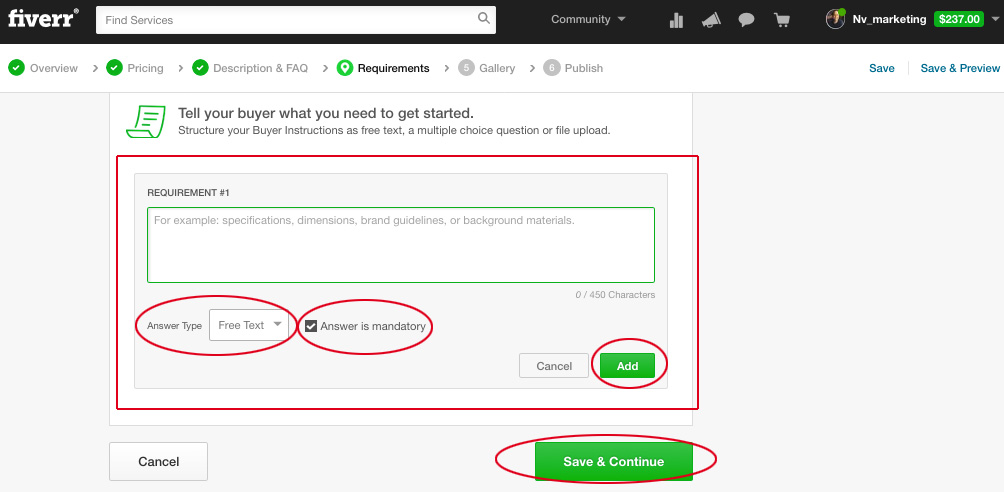 Now, you're in the Gallery section of creating your Gig. This is where you can upload examples of your work and/or upload a video to tell the Fiverr Marketplace (your potential buyers) about your Banner service on Fiverr. Statistically, those Gigs with videos do get viewed more often, so you may want to consider this. However, at the very least we recommend adding at least one example of your Banner design work here, so potential buyers can get a feel for the quality of work you provide. If you don't already have examples (even from your own websites or social networks), we recommend developing a fictitious banner example to add here. You can even create a banner ad for your Web Banner Fiverr service. This is your opportunity to show the quality of your work to someone who is considering placing an order with you. 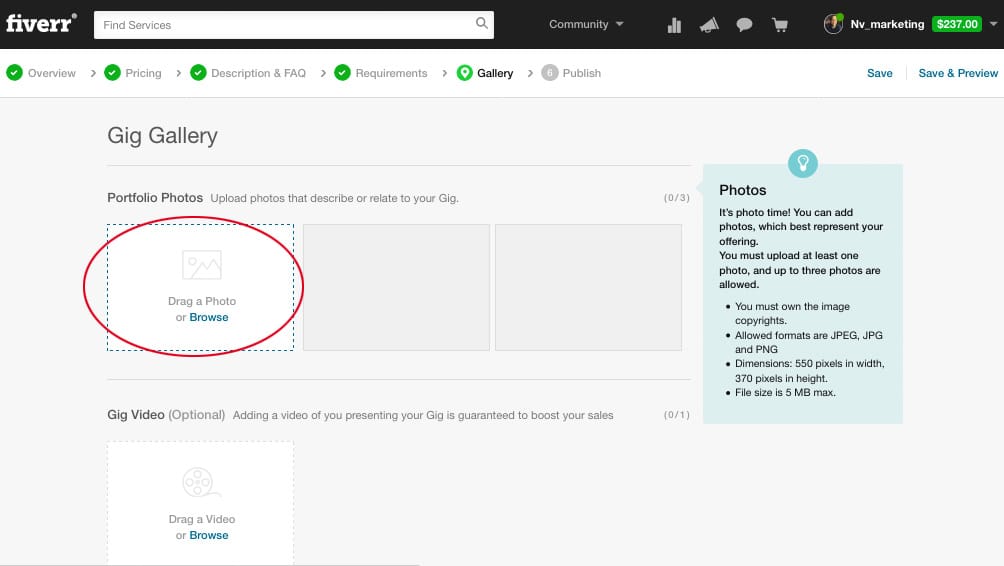 Here's an example of the banner ad we created for our example Web Banner Fiverr service. (see below). When you upload the banner image to your Fiverr Gig it has to meet the file size dimensions of 550 pixels wide by 370 pixels tall, and be in either a JPG or PNG file format. 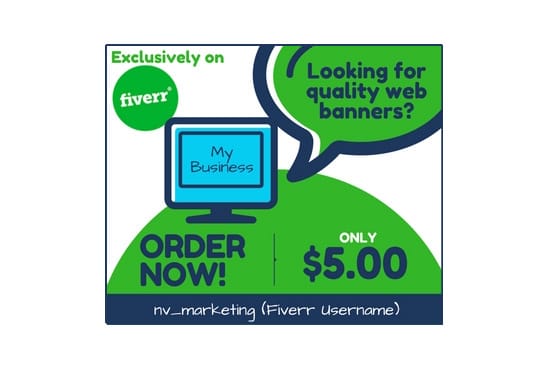 Below is a screenshot of what it looks like once you've uploaded a Gallery image. (Notice, the descriptor on the image that says, "Primary." This will be the Primary image that is displayed and associated with this Gig when a potential buyer on Fiverr reviews the Gig.) 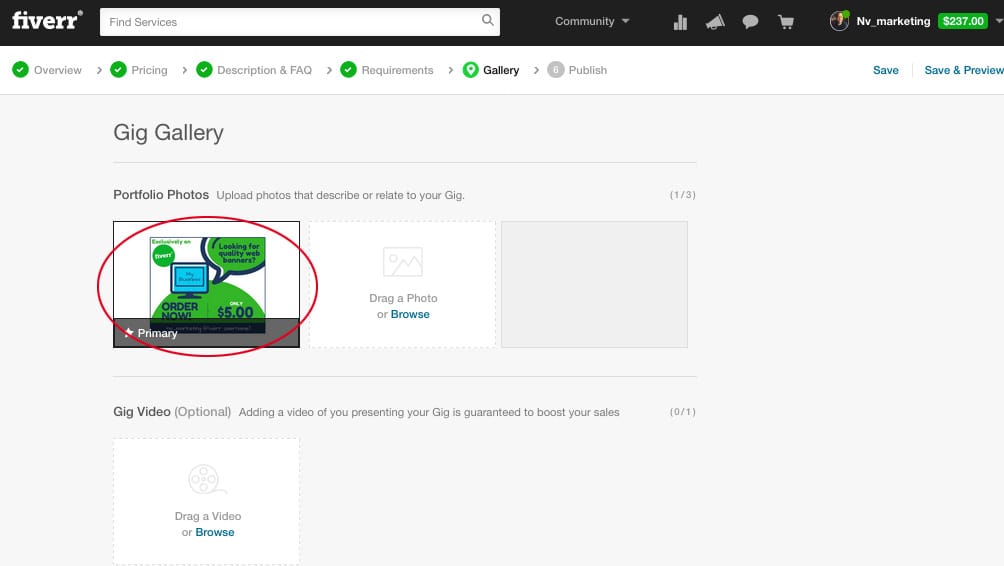 After you've uploaded at least one image, scroll down the page and click, Save & Continue. (See below screenshot) 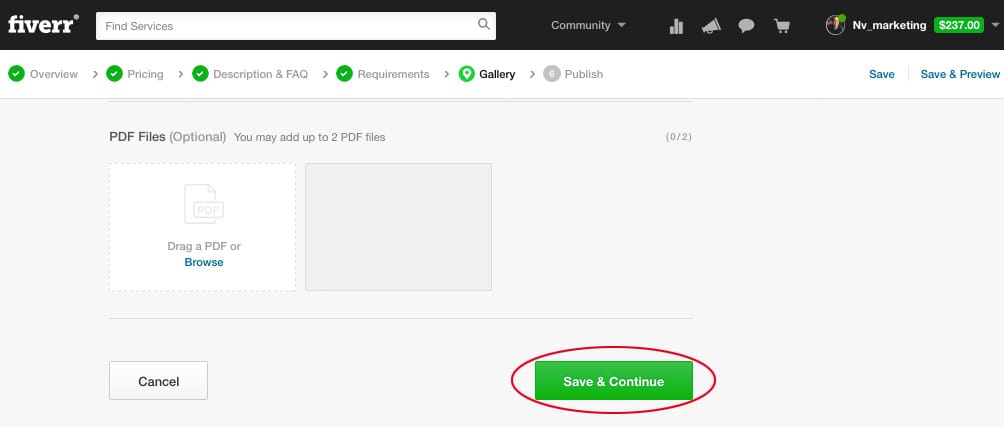 Next you'll be take to the final stage of creating your Gig. Click the Publish button to publish the Banner Gig you just created, live, to the Fiverr Marketplace. 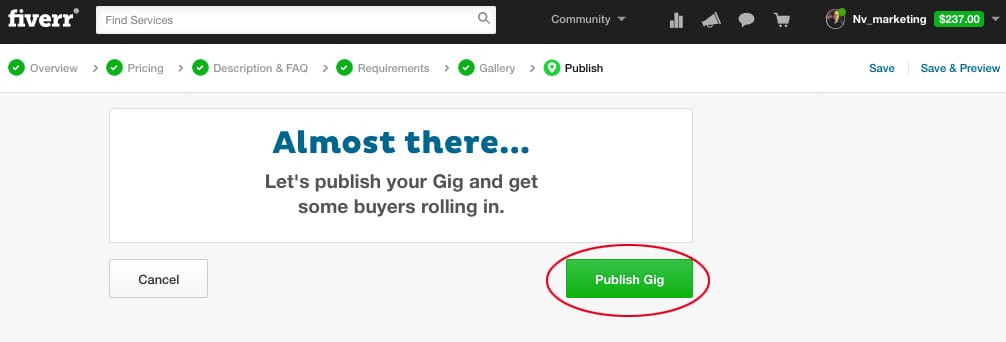 Once you publish your Gig you will be asked if you'd like to promote your specific Gig to your social networks, and/or copy the Gig web address and share it with others via email or on your website (if you have one, though it's not necessary to have a website). When you're ready, click Done. 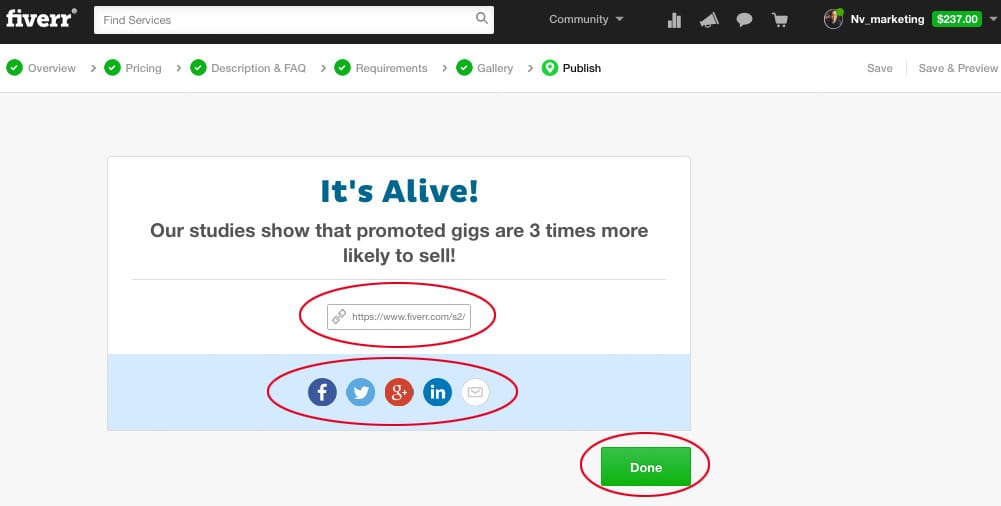 Once your Gig is fully published to the Fiverr Marketplace you will be taken back to your Gigs page within your Fiverr account. There you will see a message that congratulates you on creating your new Gig. Now, your Web Banner service is live. The Fiverr Marketplace will help promote your new Gig to potential buyers. As long as you filled out the form above to share with AutismHR your Fiverr profile username, AutismHR will also help promote you and your Gig. 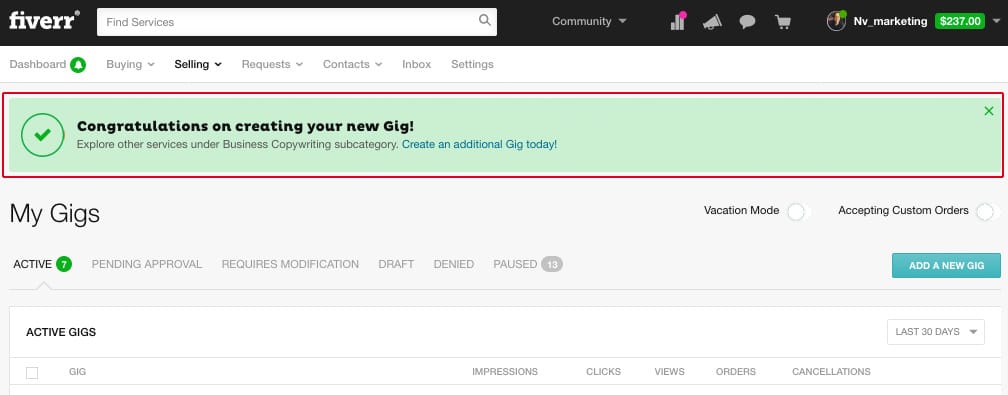 With your new Web Banner service up in the Fiverr Marketplace you'll want to know how to handle orders when they come in, among other things.
Here are some Fiverr resources that can help you: Building your Seller Profile on Fiverr This is your public-facing profile that potential Buyers in the Fiverr Marketplace will see to learn about you and the Gigs you offer. Receiving an Order on Fiverr This helps you understand what happens when a Fiverr Buyer places an Order for your Gig. Delivering an Order on Fiverr This helps you understand what happens when you Deliver the final product to your Buyer. Using the Resolution Center This helps you understand how to handle confilcts that may come up between a Buyer and you as a Fiverr Seller. Learn more about Fiverr Feedback and Ratings on your Gigs This will help you understand how Fiverr's Feedback and Ratings components work. Comments are closed.
|
 RSS Feed
